In late January 2021, the Raspberry Pi Foundation released a low-cost, high-performance micro-control board called Raspberry Pi Pico, priced at only $4. The difference from the past is that this development board cannot be installed with an operating system. Through the program development environment, such as Thonny MicroPython IDE, Visual Studio Code, Eclipse, etc., the program is compiled and uploaded to the Pico development board.
After implementing many articles on Arduino and Raspberry Pi, I am very interested in this development board and want to buy it to test the functions of this new development board. I looked for a sales channel. Due to lack of chips and no stock, I had to wait until the end of May as soon as possible. So Shanglu X found a seller who had stock and bought one. It is the Pico in the picture below, and the pins have not been soldered.
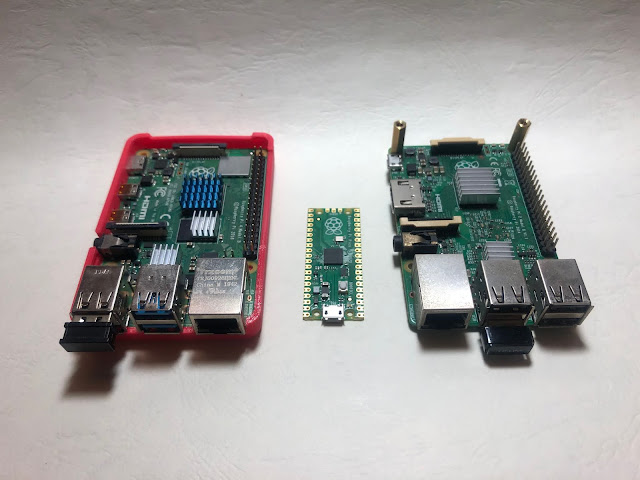 In the past, Raspberry Pi development boards (Pi1-Pi4, Zero) can be inserted into SD cards and equipped with peripheral output (HDMI), which consumes a lot of power. That is, Pi Zero is also better than ordinary development boards (such as STM32 or Arduino) consume a lot of power, and the Linux operating system is not easy to control a single pin, so it is not suitable for use as a microcontroller. Many developers only use the Raspberry Pi with a microcontroller, allowing the Raspberry Pi to be responsible for higher-level computing, network, and data storage functions, so as to collect the sensing values of the digital/analog control sent by the front-end microcontroller. In order to solve this problem, the Raspberry Pi Foundation launched a self-designed RP2040 microcontroller to make up for this deficiency. The Raspberry Pi Foundation also sells the RP2040 to electronic component suppliers. The supplier launches self-designed development boards, such as SparkFun Pro Micro-RP2040 , Pimoroni Tiny 2040 and Adafruit Feather RP2040 . The price is also higher than that of the Raspberry Pi Fund according to the website. The Pico that will be launched is much more expensive. RP2040 The IC number naming is regular, as shown in the figure below.

RP2040 has a MicroPython interface and USB flash memory format (UF2) boot program in its internal memory, which means that Pico can directly process Python code uploaded through the IDE. The specifications of Raspberry Pi Pico are as follows:


After a brief understanding of Pico's specifications, the next step is to proceed with the initial installation. The installation here takes the Python development environment as an example. If C language is used for development, it needs to be set in the C language development environment. There are two installation methods in the Pyhhon development environment. One is to directly download the file to update, and the other is to update through Thonny Micropython IDE.
(1) Go to the RP2040 website to download the MicroPython UF2 file. As shown in the red box in the figure below:

(2) Press and hold the BOOTSEL button of the development board and don't let go, then plug the Pico into the Micro USB and the other end of the USB to the computer. After connecting the Pico, release the BOOTSEL button.
(3) At this time, you can see multiple drives (left in the picture below), which will be used as a large-capacity storage device called RPI-RP2, with a size of 128MB (on the right in the picture below, 128MB is just an appearance, not storage in fact) Device RAM or flash memory). There are also two files: Info_UF2.TXT, which contains the string description of the UF2 boot program and version, and the redirect information about the RP2040 website: Index.htm.

(4) Drag and drop the MicroPython UF2 file into the RPI-RP2 drive. Pico will restart at this time. In this way, MicroPython can be run normally.
 (2) Install the Thonny Python IDE program and execute the download file to start the installation:
 Then click "Next" several times to complete the installation. After startup, you will not see the top menu. Please switch to the "normal mode" in the red frame below to see the menu. Restart Thonny.

(3) Run the Thonny Python IDE program, and then press and hold the BOOTSEL button on the development board without letting go, then plug the Pico into the Micro USB and the other end of the USB to the computer. After connecting the Pico, release the BOOTSEL button.
(4) Select the menu "Tools" → "Options" → "Interpreter", as shown in the figure below: select "MicroPython (Raspberry Pi Pico)".

(5) Continue to click "Install or Update Firmware", click "Install" when the following window appears, then the UF2 file will be downloaded and installed.
 (6) After the installation is complete, the following screen will appear, and you can start using MicroPython to control Pico.

In the above two methods, after uploading UF2, you can communicate with the development board through immediate interaction. This method is called (REPL, Read Evaluate Print Loop), which is a literal translation method through the IDE compilation environment. Directly control the development board. This has the advantage that it can immediately respond to the commands issued.
Click the green icon "Run the current program" to start compiling and upload the results. The meaning of the Thonny compilation environment icon is described in the following figure.

When you click "Run the current program", if it has not been archived, a window for saving the program will appear. Remember that if it is not for special purposes, do not name the file name boot.py or main.py. The purpose of these two file names will be explained later.

The program is usually stored in the hard disk of the computer, or directly stored in the Flash memory of the "Raspberry Pi Pico", depending on individual needs.
[Automatically run program at boot]
Regardless of whether it is Arduino, ESP32 or STM32, the program is compiled and uploaded to the development board, and it will be executed automatically next time you boot. However, the automatic execution method of Pico is a bit different. You need to select "Raspberry Pi Pico" when archiving, and then name the archived file name: main.py, so that the default program main.py will be executed automatically when booting.
After implementing many articles on Arduino and Raspberry Pi, I am very interested in this development board and want to buy it to test the functions of this new development board. I looked for a sales channel. Due to lack of chips and no stock, I had to wait until the end of May as soon as possible. So Shanglu X found a seller who had stock and bought one. It is the Pico in the picture below, and the pins have not been soldered.


RP2040 has a MicroPython interface and USB flash memory format (UF2) boot program in its internal memory, which means that Pico can directly process Python code uploaded through the IDE. The specifications of Raspberry Pi Pico are as follows:
- Processor: RP2040 Dual-core Arm Cortex-M0+ (up to 133 MHz)
- SRAM memory: 264KB on-chip
- Flash: 2MB
- GPIO: 26 multifunction GPIO pins (3.3V level) including 3 analogue inputs
- I/O: UART x2; SPI x2; I2C x2; PWM x16
- USB: USB 1.1 x1(controller and PHY with host and device support)
- PIO: Programmable I/O (PIO) x8
- Sensor: Temperature; RTC
- Power supply: 1.8-5.5V DC (microUSB)
- Size: 21 mm × 51 mm

Source:pico-datasheet
For parts on the development board, please refer to the picture below:
After a brief understanding of Pico's specifications, the next step is to proceed with the initial installation. The installation here takes the Python development environment as an example. If C language is used for development, it needs to be set in the C language development environment. There are two installation methods in the Pyhhon development environment. One is to directly download the file to update, and the other is to update through Thonny Micropython IDE.
[Installation method one: upload UF2 file]
UF2 is a file format (also known as Microsoft MakeCode) developed by Microsoft for PXT (Programming Experience Toolkit). It is especially suitable for refreshing the micro by mass storage (Mass Storage Class, also removable flash storage device). Controller, Pico uses this format to communicate, how to upload UF2 files to Pico? The steps are as follows:(1) Go to the RP2040 website to download the MicroPython UF2 file. As shown in the red box in the figure below:

(2) Press and hold the BOOTSEL button of the development board and don't let go, then plug the Pico into the Micro USB and the other end of the USB to the computer. After connecting the Pico, release the BOOTSEL button.
(3) At this time, you can see multiple drives (left in the picture below), which will be used as a large-capacity storage device called RPI-RP2, with a size of 128MB (on the right in the picture below, 128MB is just an appearance, not storage in fact) Device RAM or flash memory). There are also two files: Info_UF2.TXT, which contains the string description of the UF2 boot program and version, and the redirect information about the RP2040 website: Index.htm.

(4) Drag and drop the MicroPython UF2 file into the RPI-RP2 drive. Pico will restart at this time. In this way, MicroPython can be run normally.
[Installation method two: use Micropython IDE: Thonny]
(1) Go to the official Thonny website to download the Thonny Python IDE program.


(3) Run the Thonny Python IDE program, and then press and hold the BOOTSEL button on the development board without letting go, then plug the Pico into the Micro USB and the other end of the USB to the computer. After connecting the Pico, release the BOOTSEL button.
(4) Select the menu "Tools" → "Options" → "Interpreter", as shown in the figure below: select "MicroPython (Raspberry Pi Pico)".

(5) Continue to click "Install or Update Firmware", click "Install" when the following window appears, then the UF2 file will be downloaded and installed.


In the above two methods, after uploading UF2, you can communicate with the development board through immediate interaction. This method is called (REPL, Read Evaluate Print Loop), which is a literal translation method through the IDE compilation environment. Directly control the development board. This has the advantage that it can immediately respond to the commands issued.
[blink the on board LED ]
When using the development board for the first time, it is inevitable to turn on the LED light. Make a slight change to make the LED blink. You can enter the following program in the Thonny edit window.from machine import Pin import time led = Pin(25, Pin.OUT) while True: led.value(1) # LED on time.sleep(1) # wait 1 sec led.value(0) time.sleep(1) # LED off

Click the green icon "Run the current program" to start compiling and upload the results. The meaning of the Thonny compilation environment icon is described in the following figure.

When you click "Run the current program", if it has not been archived, a window for saving the program will appear. Remember that if it is not for special purposes, do not name the file name boot.py or main.py. The purpose of these two file names will be explained later.

The program is usually stored in the hard disk of the computer, or directly stored in the Flash memory of the "Raspberry Pi Pico", depending on individual needs.
[Automatically run program at boot]
Regardless of whether it is Arduino, ESP32 or STM32, the program is compiled and uploaded to the development board, and it will be executed automatically next time you boot. However, the automatic execution method of Pico is a bit different. You need to select "Raspberry Pi Pico" when archiving, and then name the archived file name: main.py, so that the default program main.py will be executed automatically when booting.
[Result]
After the installation is complete, upload the first program to make the LED blink. The overall operation is much simpler than STM32. I believe it will make it easier for more friends who want to enter the microcontroller field. The next few articles will continue to understand the control method of Pico.[Reference]
- RP2040 website
- rp2040-datasheet
- Getting-started-with-pico